
Home
/
ESP32 Display >> Guition P4 Series (ESP32-P4)
/
Surenoo ESP32-S3 1.28" 240*240 Round Bionic Eyes LCD Display Module Screen Panel Open Source for 2nd Development Xiaozhi AI Robot Deepseek Qwen3 Doubao WIFI Bluetooth for Ropet


Surenoo ESP32-S3 1.28" 240*240 Round Bionic Eyes LCD Display Module Screen Panel Open Source for 2nd Development Xiaozhi AI Robot Deepseek Qwen3 Doubao WIFI Bluetooth for Ropet
WISHLIST
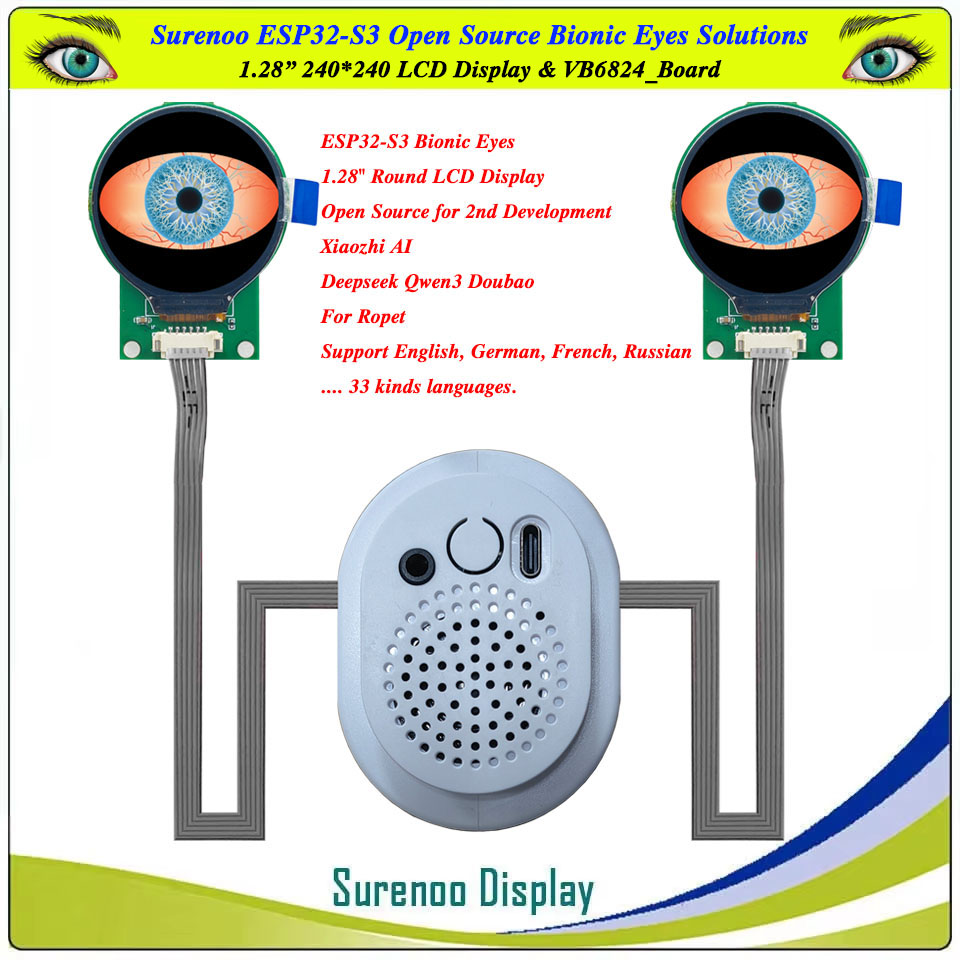
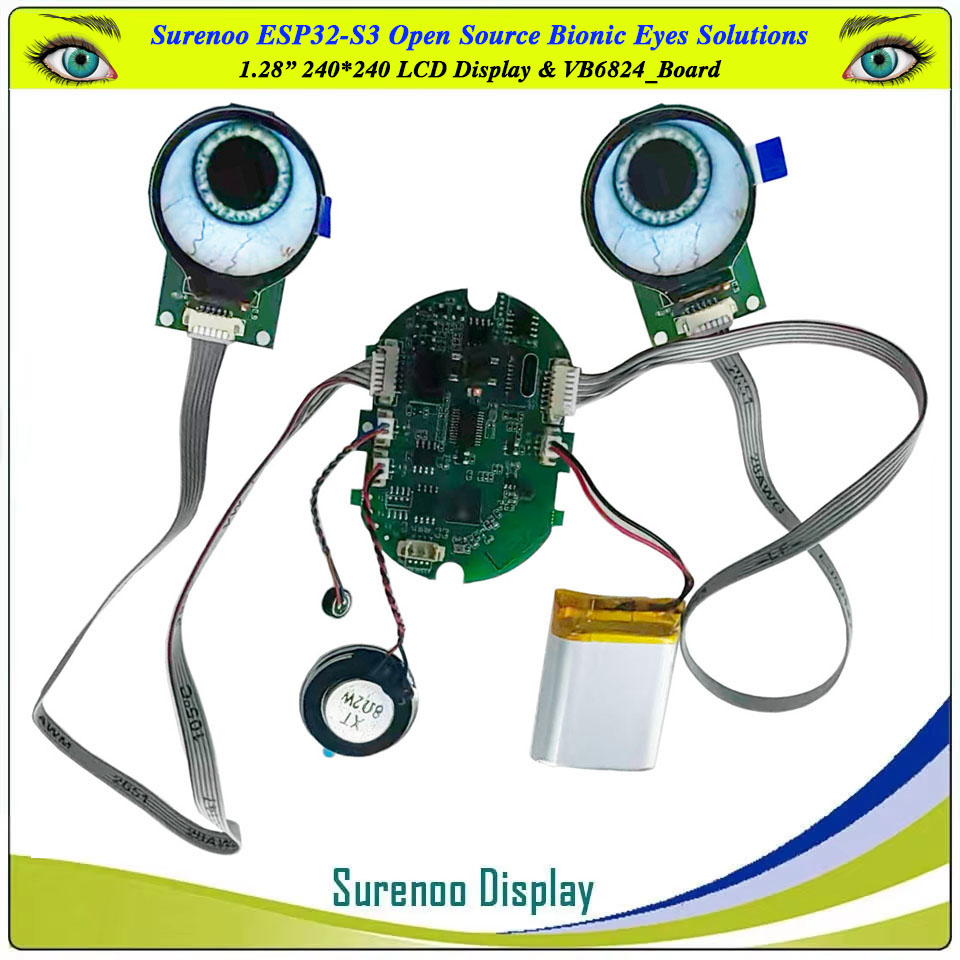
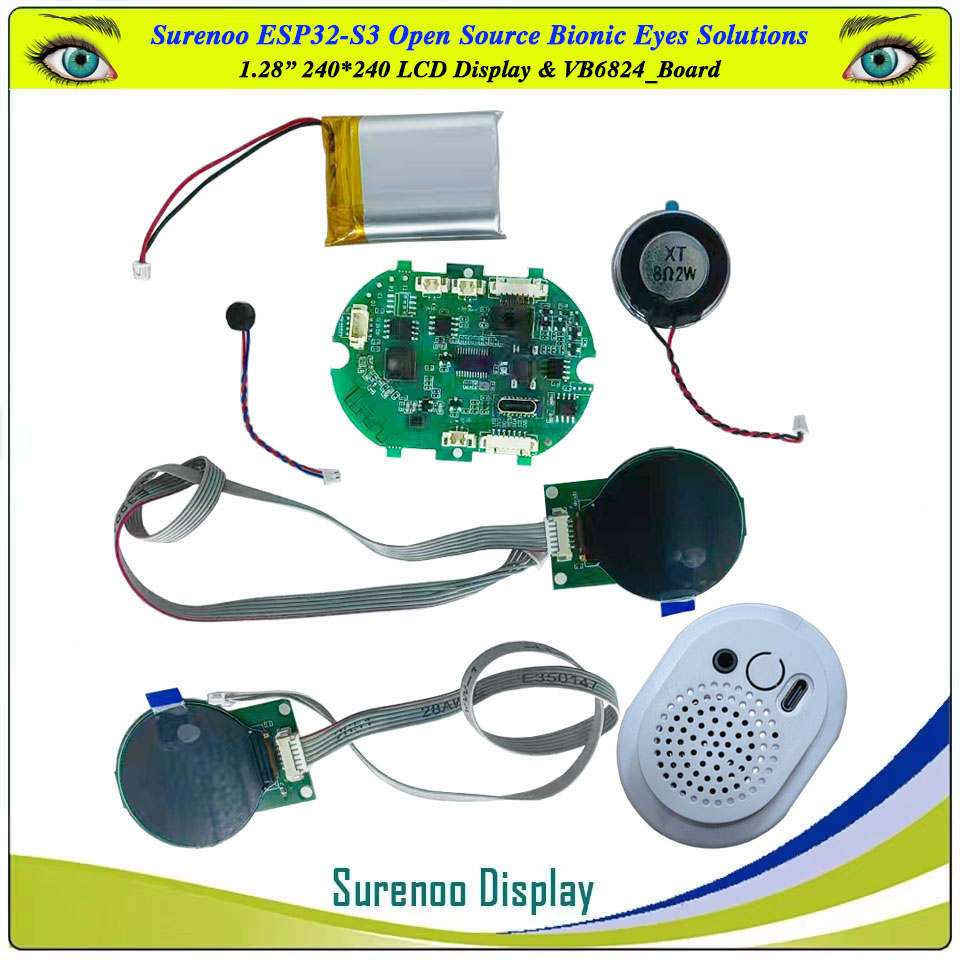
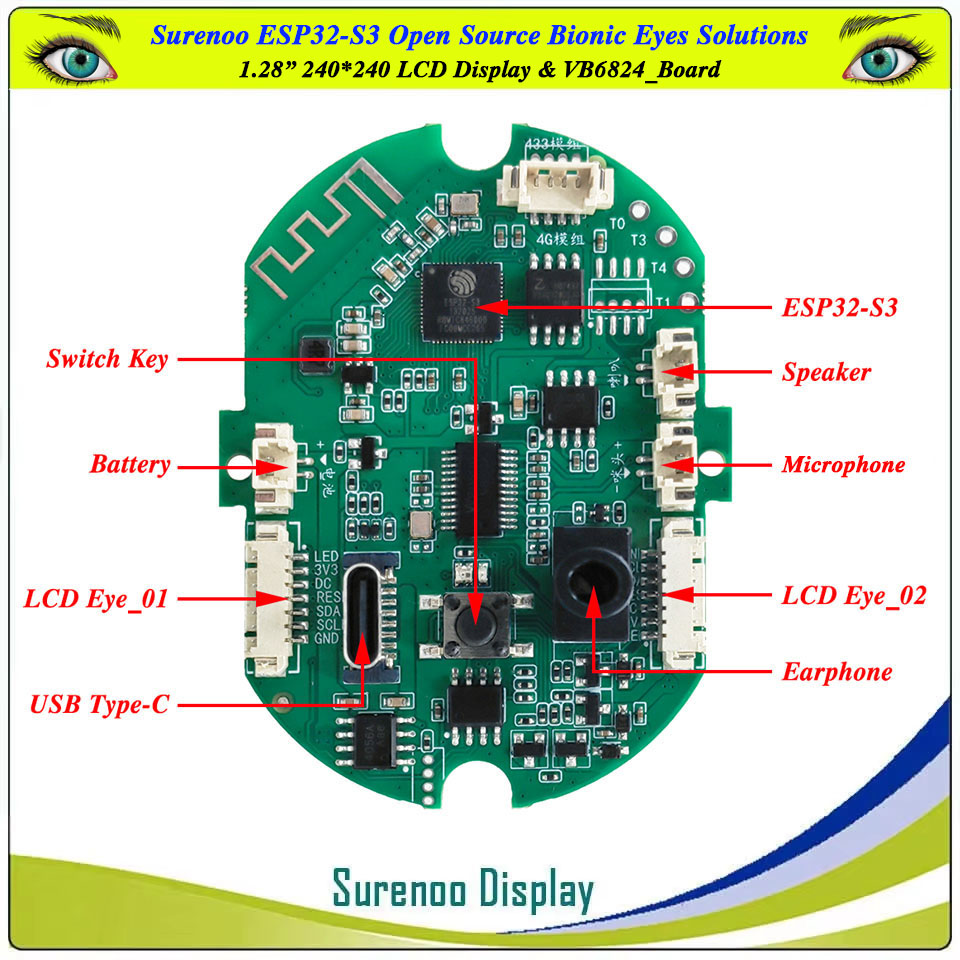
Model No.: ESP32-S3 Bionic Eyes (VB6824_Board) with Dual 1.28" Display
Main Controller: ESP32-S3
Main Controller: ESP32-S3
Quantity
-
DetailSurenoo ESP32-S3 Bionic Eyes Solutions1.28" 240*240 LCD Display (VB6824_Board)
Open Source for 2nd Development
Open Source: https://github.com/SmartArduino/RoPet_ESPS3_AI_EYE/tree/main
YouTube HD Link: https://www.youtube.com/watch?v=x_gtGXtfr5I-
Features
>> ESP32-S3 Main Chip>> Support WIFI and Bluetooth>> 4G Module is Optional>> Support USB Type-C Charge>> Support USB Type-C Burn Fireware>> Support 3.5MM EarPhone>> Dual 1.28" 240*240 Round SPI LCD Module>> Battery Power Supply (3.7V, 1200mA)>> Free 8Ω/2W Speaker>> Free Microphone>> Free White Case>> Open Source: https://github.com/SmartArduino/RoPet_ESPS3_AI_EYE/tree/main-
Packing List
1. ESP32-S3 Main Board X1PCS2. 1.28" 240*240 SPI LCD Module X2PCS3. 3.7V/1200mA LI-Battery X1PCS4. 8Ω/W Speaker X1PCS5. Microphone X1PCS6. White Case X1Sets-
How to use it? (Must work in WIFI network)
>> Device Distribution Network1. When you get this products, you must first network the equipment before it can be used normally.2. Press the key 3 times in a row, and the voice broadcast prompts "enter network distribution mode" to start network deployment.3. If you want to connect to other networks, you can press the key 3 times in a row to re-enter the network distribution mode.4. The distribution network process is shown in the figure below.4.1 Open the WLAN Setting on your SmartPhone, Choose "Xiaozhi-xxxx" network.4.2 Type "192.168.4.1" in your Google Chrome Browsers to view it, choose your local WIFI Network, enter the password.4.3 Device will restart in 3 seconds.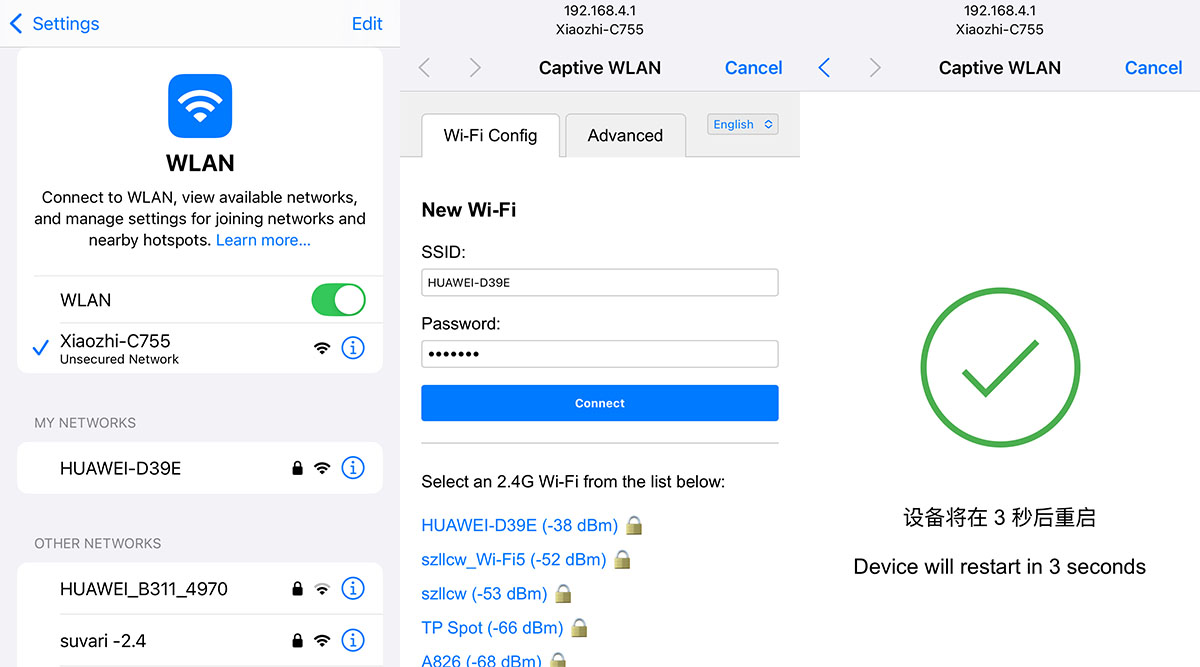
>> Add DeviceAfter the network configuration is successful, it will prompt "Please log in to the control panel to add the device, enter the Verification Code xxxxxx", remember the verification code, and it is useful to add the device later.1. Please type "https://xiaozhi.me" in Google Chrome Browser in English Page.2. Please use your phone to login in XiaoZhi AI Platform.3. Click "Console" to Create Agent, you can Edit "Configure Role" by your hobby.4. Click "Add Device" to enter "Verification Code xxxxxx", and then re-start the device.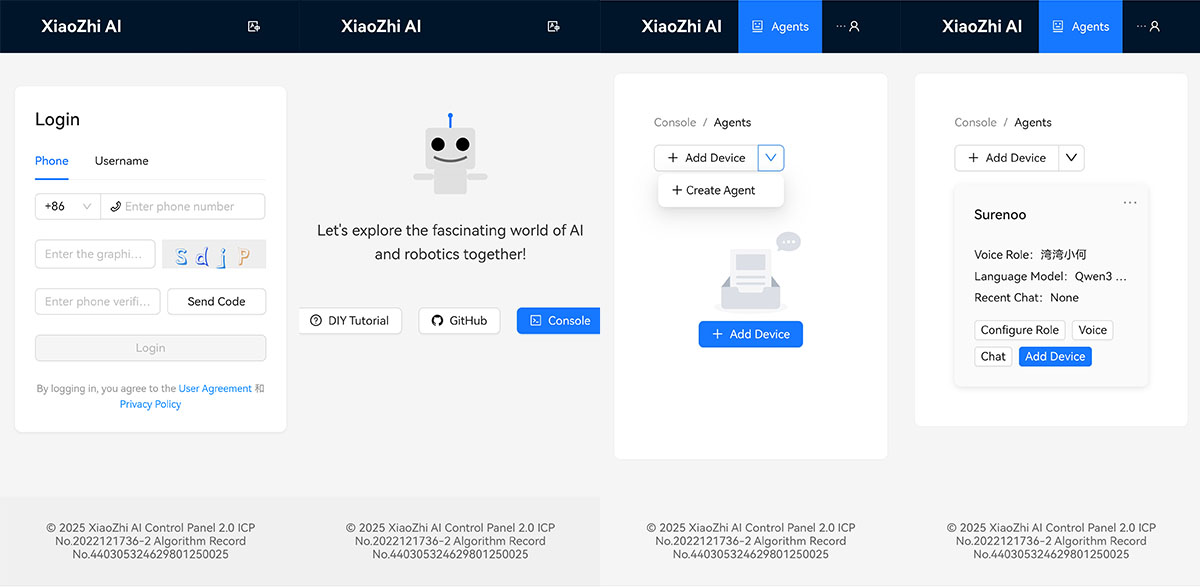
>> How to wake-up it?How to wake up to dialogue: The default wake-up word is "Hi Baby", say "Hi, Baby" to wake up the device and use it normally.Switch Key functions:1. Click the button: press to switch Ask's intercom state, idle state (idle state needs to be woken up with a wake-up word before normal intercom) and listening state (just speak directly) back and forth.2. Double-click button: Double-click the button is used to change the wake-up word. (This function is NOT opened)3. Triple button: enter the network distribution mode and reconfigure the network.4. Long press the button: the device is turned off and turned on.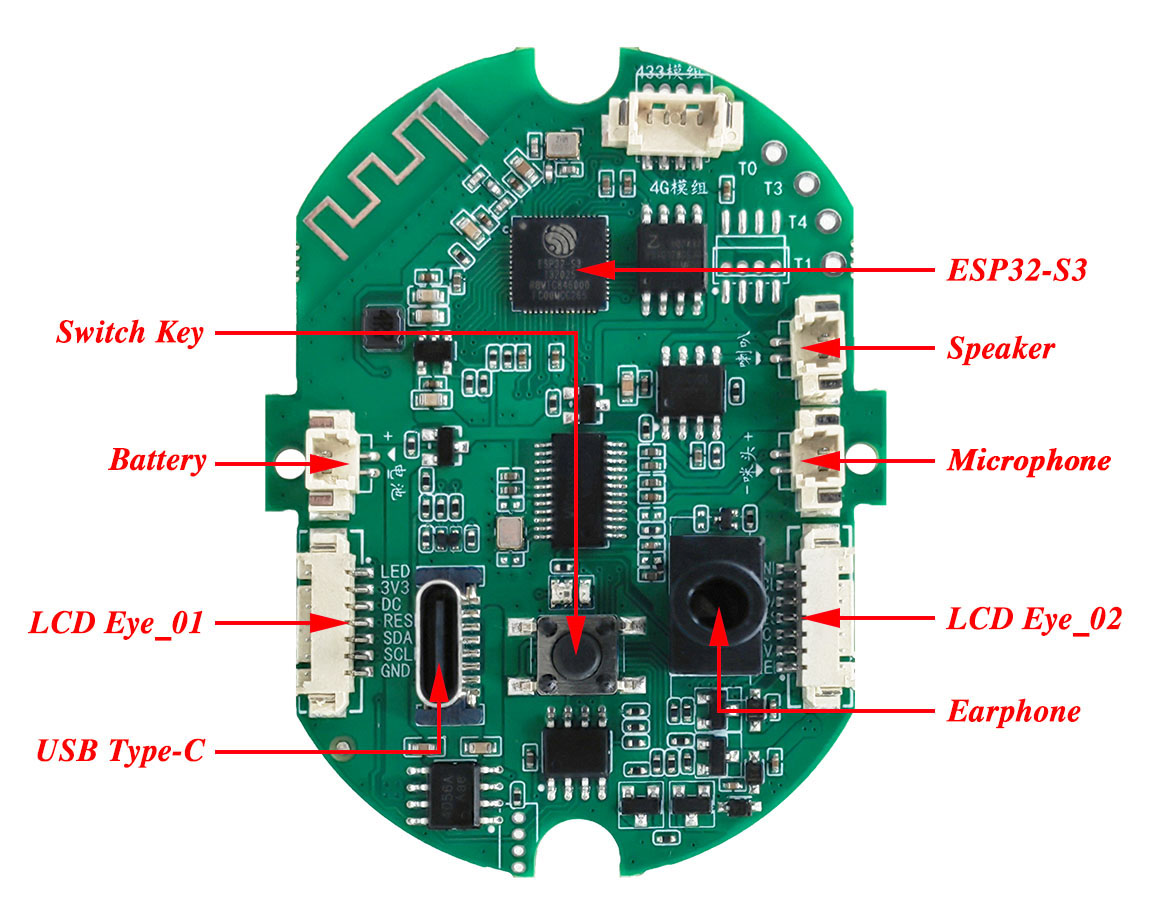
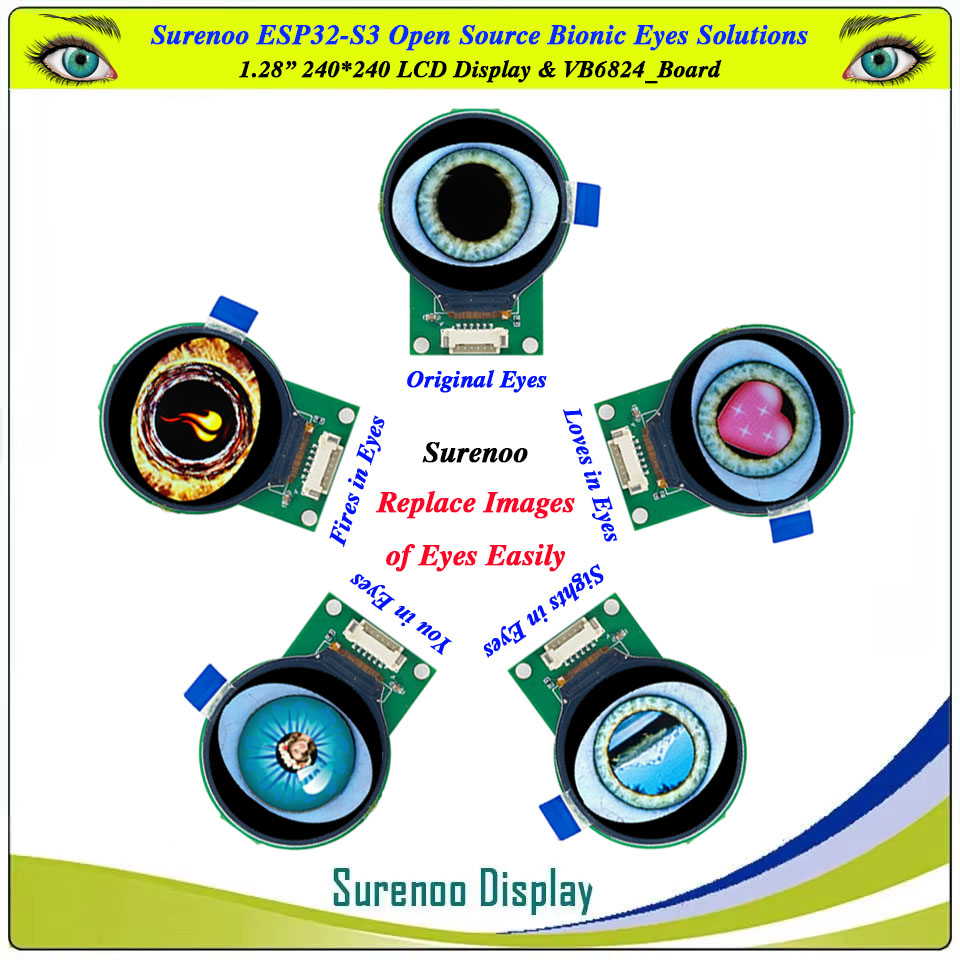
>> How to use the Plugin (doit-gen-eye-firmware) to replace the Images of Bionic Eyes in your Firmware(*.bin)?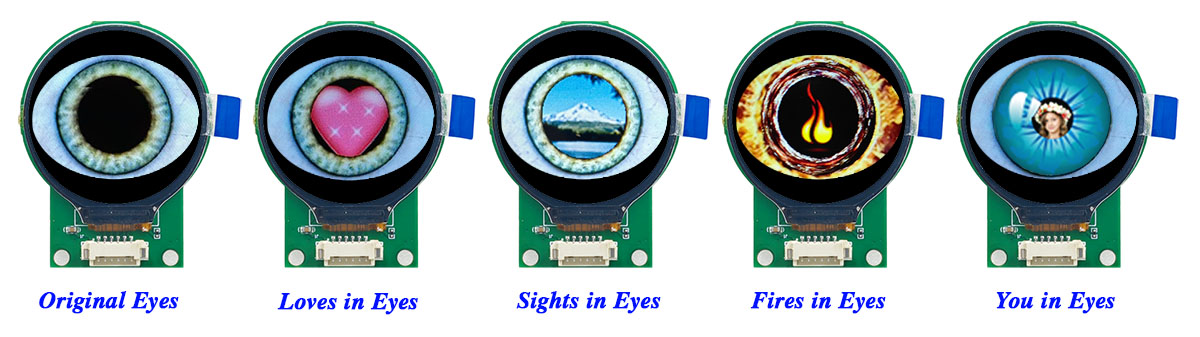
1 Prepare MaterialsRefer to [Customization Document]: https://learn.adafruit.com/animated-electronic-eyes/customizing
* sclera.png* iris.png* lid-upper.png* lid-lower.png* lid-upper-symmetrical.png* lid-lower-symmetrical.png2. Modify the configuration file(1). Modify the default under [firmware] to point to the .h file of the corresponding sizeA). For 1.28-inch screen, select defaultEye_1.28.hB). For 0.71-inch screen, select defaultEye_0.71.h(2). Modify the configuration file and modify the input_firmware under [firmware] to point to the corresponding firmware typeA). V6824 board with 1.28 inch Screen select RoPet_ESPS3_AI_EYE_6824_1.28_en.binB). V6824 board with 0.71 inch Screen select RoPet_ESPS3_AI_EYE_6824_0.71_cn.binC). V8311 board with 1.28 inch Screen select RoPet_ESPS3_AI_EYE_8311_1.28_cn.bin(3). Modify the configuration file, modify src_dir and name_map to point to the prepared material, and screen_type to point to the screen type (1.28 or 0.71)
(4). Execute doit_gen_eye_firmware.exe(5). Burn the firmware.bin firmware (For firmware burning methods, see Using flash_download_tool to burn)3. How to customize the eye style firmware?(1). Replace the material array of defaultEye_1.28.h or defaultEye_0.71.h with your own project;(2). Compile and generate the firmware;(3). Place the firmware under "firmware";(4). Modify the configuration file, pointing `input_firmware` to the compiled firmware;(5). Refer to the instructions again to generate the new firmware.
>> How to burn the Firmware(*.bin) to V6824 Board?
Firmware: https://xiaozhi.doit.am/details.html?id=65
Tools: https://dl.espressif.com/public/flash_download_tool.zip
1. How to enter the programming mode?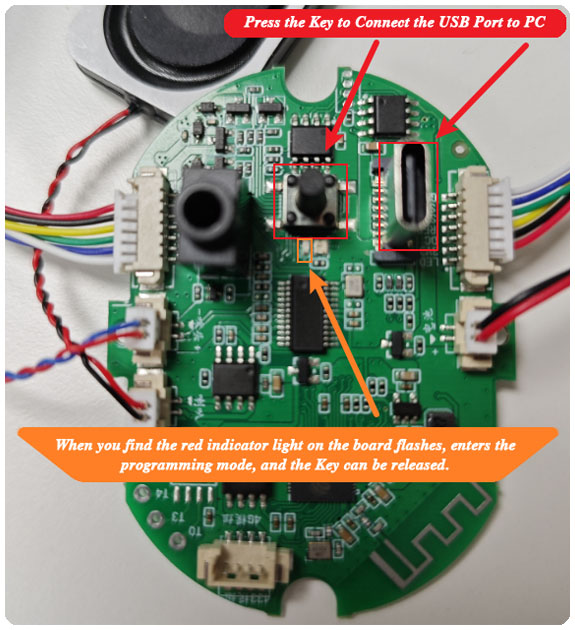
VB6824 board, press and hold the Key at the same time, use USB to connect to PC, the red indicator light on the board flashes, the mark enters the programming mode, and the Key can be released. (this process can open the serial port tool, when the Key is pressed into the USB, see these serial port tool to recognize the serial port. )
2. Firmware Burning
Open the provided Flash Download Tool as following Images: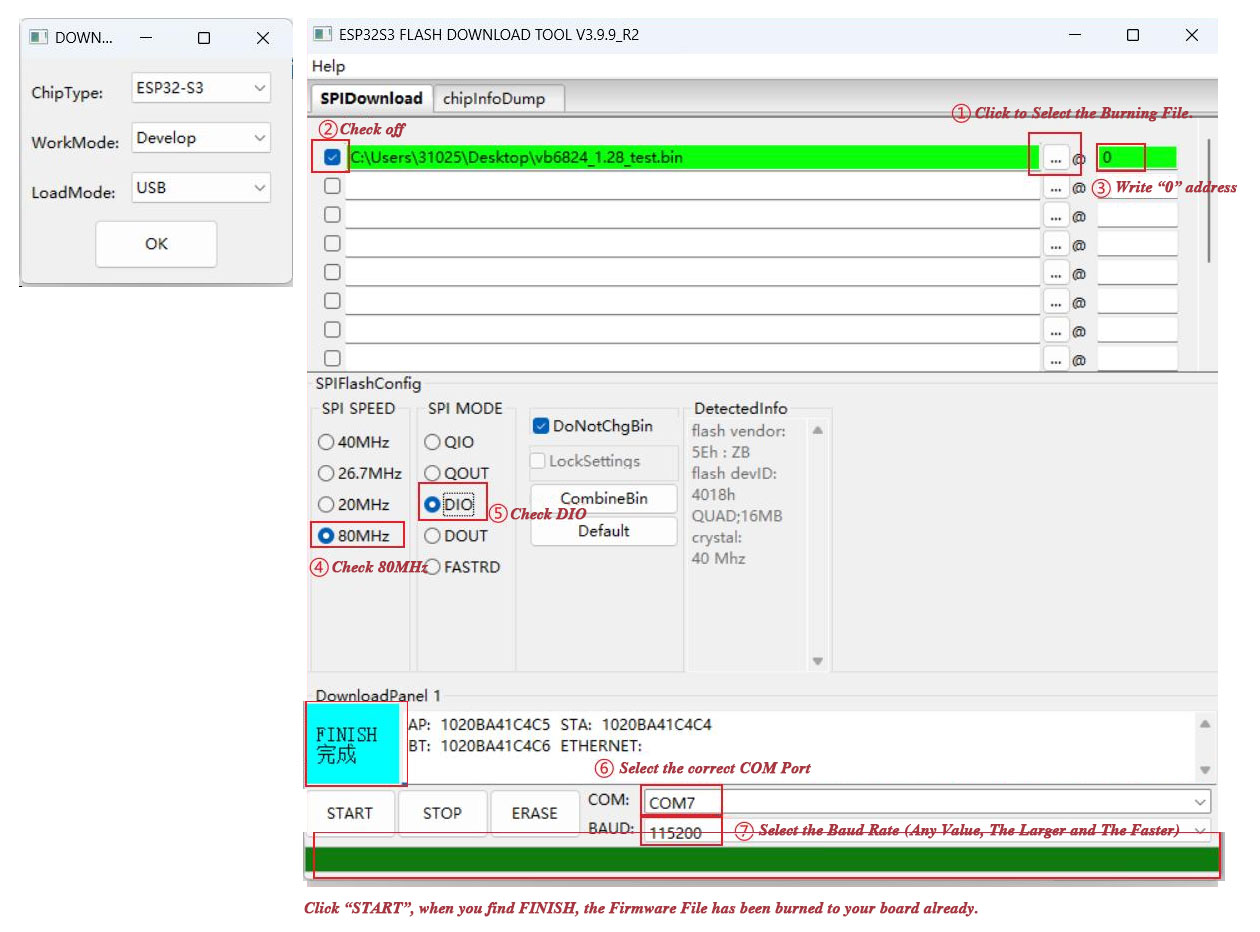
-
-
Customer ReviewsNo comments